Yes, Virginia,
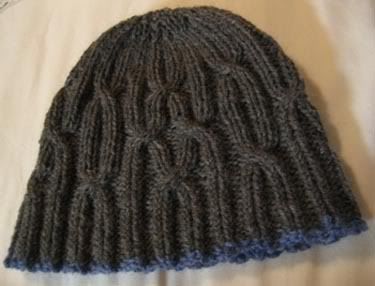
You can make an adult-size cabled hat on US7 needles from one skein of Cascade 220, with plenty left over.
Just putting it out there in case, you know, there are more knitters like me who remain ignorant of the general ballpark amount of yarn needed to make a hat, spend ages trawling the web to no avail, and finally find the answer by saying “to hell with planning” and just knitting one. Like this, the What Hat.
Yarn: Cascade 220, less than one skein (approximately 5-6 yds of contrast color yarn for edge)
Pattern: My own (see towards end of rambling)
Needles/gauge: US7/3.75mm 5sts/inch x 7 rows/inch
Circumference: stretches comfortably to fit head 22-23 inch in circumference. (16 inches lying flat and unstretched)
Length: 8 inches
This is the long requested and long given-up on present for I. the fiancé --- a hat that so resisted being knit that inquiring after its imaginary progress had become a long-standing joke between us for the past year. Typical beginning of an exchange:
I. : How’s my hat going?
Me (in my best glib voice): What hat?
Cursed with a killer combination of pain-in-the-ass pattern (two color brioche-stitch in the round from Weekend Knitting) and DK-weight yarn instead of the worsted called for, the poor hat in its first incarnation never had a chance. Even with the yarn shop hours invested in choosing the exact shades of color that I. would permit on his head (who knew a man normally so oblivious to color would be so particular about what shades he would wear?). After struggling for days with the annoying cast-on and always ending up with a muddle instead of distinct ribs in alternating colors, I banished the project to a dark corner of the closet. It wasn’t until this winter when I, stressed into distraction by the holiday knitting deadlines looming overhead, became obsessed with wrestling that brioche stitch pattern into submission. To make life easier this time, I started with worsted weight yarn: Cascade 220 in a nice, masculine combination of blue and heathery grey, bought without consulting the fiancé’s color opinion. This time, on try number two with no rhyme or reason I can discern, the hat finally settled into looking how it should. But of course there was one problem: my hard-won distinct ribs of alternating color made a fabric so open and loose on needles that should give gauge that I could see the outline of my hand through it. Not the best thing for blocking out the cold. Since I was in the grips of procrastination, I couldn’t just give the hat up again. Thus began the web-trawling to determine whether one skein of Cascade 220 is sufficient for a cabled hat. My rational?
Blue edged grey cabled hat = knitting that wouldn’t bore me to tears but still masculine and understated enough that I. would deign to put it on his head (fingers crossed for the latter)
In any case, I cast on the magical 96 stitches and just went with it, making it up along the way. The hat practically flew off my needles once I figured out how to travel a rib on the fabric. It was more fun than watching argyle diamonds form to see the cables twining into the pattern I had in my head. I’m so delighted with how this seat-of-my-pants effort turned out that I’m half tempted to keep the hat for myself! Now, here’s hoping I. likes his surprise improv hat!
In case you too want to get creative with simple cables on headgear, here is a general recipe for you to play around with:
With a worsted weight yarn of similar gauge, cast on 96 stitches, join in the round (if you leave a tail of yarn from your cast-on, you won’t need to use a marker to mark the beginning of the round since that is where the tail will be).
Knit in 2x2 rib (I did twisted rib: *knit through the back loop 2, P2*) for 2 inches (do more if you want a longer hat, e.g. be able to fold up the brim of the hat)
Decide how you want the ribs to travel. I first did a pattern in which two straight ribs flanked a pair of crossing ribs as in the picture below.(When I started traveling and crossing ribs, I only knit the straight ribs through the back loop)
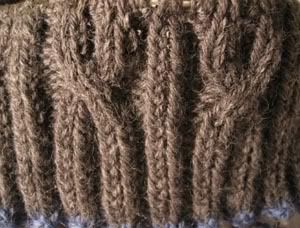
After crossing the ribs and traveling them back to being parallel with the straight ribs, I continued in 2x2 rib for six rows. Then, for every other set of four ribs (crossed pair flanked by 2 straight), I crossed the straight flanking rib with the crossed rib next to it. My next and last cross involves the first set of ribs I crossed.
Whatever you would like to do with your ribs, all you need to know is the following for moving and crossing them:
1. To travel a rib through background purl stitches, you move the rib 1 stitch to the left or right per row. To cant a rib left, hold 2 rib stitches in front, purl next stitch, knit the 2 held rib stitches. To cant a rib to the right, hold the purl stitch before the rib in back, knit the two rib stitches, purl held stitch.
2. To cross two ribs when you have traveled them right next to each other, you hold the two stitches of one rib in front of the other. To cross a right rib in front of the left, hold the right rib stitches in front, knit the left rib stitches, then the held right rib stitches. To cross the left rib in front of the right, hold the right rib stitches in back, knit the left rib stitches, then knit the right rib stitches.
I knit without decreasing until the hat was about 1.5 inches less than the length I wanted it to be. Then I did rows of decreasing. I winged which stitches I decreased along the way but followed this general hierarchy of stitch elimination: first went one of the purl stitches between each pair of ribs (P2tog get K2, P1), second the ribs lost a stitch each (K2tog to give K1, P1), third I began to merge the ribs, and last I knit across all the stitches.
Row 1: Dec evenly to 72 sts
Row 2 – 4, 6, 8: Knit the knits, purl the purls
Row 5: Dec evenly to 40 sts
Row 7: Dec evenly to 32 sts
Row 9: Dec evenly to 16 sts
Row 10: Knit
Row 11: Dec evenly to 8 sts
Cut yarn, leaving at least 6 inch tail. Pull tail through eight stitches with tapestry needle to close the hole, weave in ends, and you have yourself a simple cabled hat!
Just putting it out there in case, you know, there are more knitters like me who remain ignorant of the general ballpark amount of yarn needed to make a hat, spend ages trawling the web to no avail, and finally find the answer by saying “to hell with planning” and just knitting one. Like this, the What Hat.
Yarn: Cascade 220, less than one skein (approximately 5-6 yds of contrast color yarn for edge)
Pattern: My own (see towards end of rambling)
Needles/gauge: US7/3.75mm 5sts/inch x 7 rows/inch
Circumference: stretches comfortably to fit head 22-23 inch in circumference. (16 inches lying flat and unstretched)
Length: 8 inches
This is the long requested and long given-up on present for I. the fiancé --- a hat that so resisted being knit that inquiring after its imaginary progress had become a long-standing joke between us for the past year. Typical beginning of an exchange:
I. : How’s my hat going?
Me (in my best glib voice): What hat?
Cursed with a killer combination of pain-in-the-ass pattern (two color brioche-stitch in the round from Weekend Knitting) and DK-weight yarn instead of the worsted called for, the poor hat in its first incarnation never had a chance. Even with the yarn shop hours invested in choosing the exact shades of color that I. would permit on his head (who knew a man normally so oblivious to color would be so particular about what shades he would wear?). After struggling for days with the annoying cast-on and always ending up with a muddle instead of distinct ribs in alternating colors, I banished the project to a dark corner of the closet. It wasn’t until this winter when I, stressed into distraction by the holiday knitting deadlines looming overhead, became obsessed with wrestling that brioche stitch pattern into submission. To make life easier this time, I started with worsted weight yarn: Cascade 220 in a nice, masculine combination of blue and heathery grey, bought without consulting the fiancé’s color opinion. This time, on try number two with no rhyme or reason I can discern, the hat finally settled into looking how it should. But of course there was one problem: my hard-won distinct ribs of alternating color made a fabric so open and loose on needles that should give gauge that I could see the outline of my hand through it. Not the best thing for blocking out the cold. Since I was in the grips of procrastination, I couldn’t just give the hat up again. Thus began the web-trawling to determine whether one skein of Cascade 220 is sufficient for a cabled hat. My rational?
Blue edged grey cabled hat = knitting that wouldn’t bore me to tears but still masculine and understated enough that I. would deign to put it on his head (fingers crossed for the latter)
In any case, I cast on the magical 96 stitches and just went with it, making it up along the way. The hat practically flew off my needles once I figured out how to travel a rib on the fabric. It was more fun than watching argyle diamonds form to see the cables twining into the pattern I had in my head. I’m so delighted with how this seat-of-my-pants effort turned out that I’m half tempted to keep the hat for myself! Now, here’s hoping I. likes his surprise improv hat!
In case you too want to get creative with simple cables on headgear, here is a general recipe for you to play around with:
With a worsted weight yarn of similar gauge, cast on 96 stitches, join in the round (if you leave a tail of yarn from your cast-on, you won’t need to use a marker to mark the beginning of the round since that is where the tail will be).
Knit in 2x2 rib (I did twisted rib: *knit through the back loop 2, P2*) for 2 inches (do more if you want a longer hat, e.g. be able to fold up the brim of the hat)
Decide how you want the ribs to travel. I first did a pattern in which two straight ribs flanked a pair of crossing ribs as in the picture below.(When I started traveling and crossing ribs, I only knit the straight ribs through the back loop)
After crossing the ribs and traveling them back to being parallel with the straight ribs, I continued in 2x2 rib for six rows. Then, for every other set of four ribs (crossed pair flanked by 2 straight), I crossed the straight flanking rib with the crossed rib next to it. My next and last cross involves the first set of ribs I crossed.
Whatever you would like to do with your ribs, all you need to know is the following for moving and crossing them:
1. To travel a rib through background purl stitches, you move the rib 1 stitch to the left or right per row. To cant a rib left, hold 2 rib stitches in front, purl next stitch, knit the 2 held rib stitches. To cant a rib to the right, hold the purl stitch before the rib in back, knit the two rib stitches, purl held stitch.
2. To cross two ribs when you have traveled them right next to each other, you hold the two stitches of one rib in front of the other. To cross a right rib in front of the left, hold the right rib stitches in front, knit the left rib stitches, then the held right rib stitches. To cross the left rib in front of the right, hold the right rib stitches in back, knit the left rib stitches, then knit the right rib stitches.
I knit without decreasing until the hat was about 1.5 inches less than the length I wanted it to be. Then I did rows of decreasing. I winged which stitches I decreased along the way but followed this general hierarchy of stitch elimination: first went one of the purl stitches between each pair of ribs (P2tog get K2, P1), second the ribs lost a stitch each (K2tog to give K1, P1), third I began to merge the ribs, and last I knit across all the stitches.
Row 1: Dec evenly to 72 sts
Row 2 – 4, 6, 8: Knit the knits, purl the purls
Row 5: Dec evenly to 40 sts
Row 7: Dec evenly to 32 sts
Row 9: Dec evenly to 16 sts
Row 10: Knit
Row 11: Dec evenly to 8 sts
Cut yarn, leaving at least 6 inch tail. Pull tail through eight stitches with tapestry needle to close the hole, weave in ends, and you have yourself a simple cabled hat!
posted by Marie at 11:18 PM
![]()


6 Comments:
The hat looks great! I love the cables, and it looks really nice and warm. Nice job! I might try your recipe! I am also trying to finish a mitten for my husband which he has been asking about. Every couple of years he will remind me (me: what mittens?) :) Merry Christmas to you!
Cute! Very interesting pattern, I'm sure I. will love it.
Hope you have a great vacation!
i spring over the explanation (i don't understand anyway...) to wish you a mery christmas Marie!!!!
Your hat looks great Marie! Shows that sometimes we rely too much on written patterns and a bit of imagination + a fair knowledge of maths works wonders... Happy Christmas!
What a great hat, looks nice, warm and cozy!
Manly knitting is usually so boring...I love your hat!
Post a Comment
<< Home